SINGLE-HIP RETURNS AND ATTACKS
This is a family of techniques, which contains several of what I call ”world class” techniques. The obvious characteristic of these techniques is that they produce a powerful second strike which follows very quickly after the first, and which often comes in at an unexpected angle. They include techniques that are best used when the opponents fight with opposite hands, as well as techniques most effective against opponents fighting with the same hand as the attacker. This is noted in the descriptions of the variations. In any case, they are singularly effective, and very difficult to defend against, if properly executed.
Basically, the movement follows a forehand strike. The sword is then pulled back, and around for a strike to the opposite side of your opponent. The hips, instead of coming forward to impel the blade, continue to turn in a clockwise direction, in a motion similar to the start of a Judo roll.
While the initial motion of the sword is similar to my side return technique, (except for the third variant) the subsequent forward movement of the sword takes advantage of the principle of “reduced radius of rotation“, wherein the speed of the blade is increased by reducing the distance between the center point of the circle around which the blade is traveling, and the balance point of the blade. The power of the technique is enhanced by the fact that the radius of rotation is reduced twice, during the technique.
There are three main variants of this blow. The variations are in the angles of the attack, which are, respectively, horizontal, slanted down at about 45 degrees, and vertical, with the tip down. The important point to remember is that the angle of attack of these techniques is determined by the angle of the return of the blade, which defines the plane in which the attack will occur. This plane can be moved, but the blade’s path must remain in the plane.
|
|

Figure 29a
|
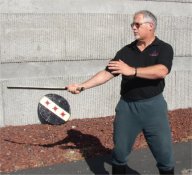
Figure 29b
|
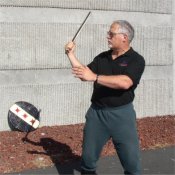
Figure 29c
|
|
|
|
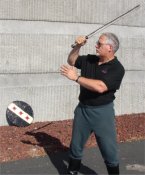
Figure 29d
|
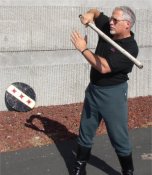
Figure 29e
|
|
Figures 29a through 29e illustrate the basic movements involved (in this case, for variation 2).
- Note in the transition between figure 29a to figure 29b that the blade is pulled back similarly to the movement involved in a normal side return. In this case, there is more upward movement to the blade, to define the plane of the attack (in this case, about 45 degrees).
- Besides this upward movement, the critical difference from a side return is that the blade is allowed to roll around towards the back of your head, as can be seen in figure 29c. In this figure, the blade is being ”curled” towards your forehead.
- In figure 29d, the sword hand has reached the point where it is as close as it will come to your head, and as high as it will reach. At this point, the hand must be stopped to change the center of rotation of the blade from the middle of your body to your sword hand.
- Stopping your hand is accomplished by allowing your sword elbow to rise up – essentially following the blade through a small part of the remaining portion of the swing plane. When this happens, the sword speeds up, and continues its path, along the swing plane, to the target. The sword hand should not move forward from the position where it was stopped.
Note that the hand does not rise over the head – it stays below the top of the head and, since your body rotates during this technique, it stays generally in front of your face. If you unlock your shoulder to move your blade over your head, you will lose power.
More detailed directions for movement can be found below, in the descriptions of the major variations of this technique.
Variation 1a – Horizontal Pass
Description
This variation is most useful when used against an opponent who fights with the opposite hand from you. It consists of a combination of two blows, the second of which arrives quickly after the first, and from a very different angle. It does involve what could be called a passing attack on your opponent’s shield side, targeting the back of the side of your opponent’s helm. This variation uses a horizontal plane for the transition between the two blows. The plane rises during the transition.
While I cannot say for certain that he developed this variation, I first noticed it being used to great effect by Duke James Greyhelm, of the West.
Stance
I prefer to use these techniques from my standard stance, but I believe it could be used with a stance that had the sword-foot forward. The techniques are more effective if the shield foot ends up being forward when the actual blow is struck. I think that a slide-step (from a traditional stance) is quicker and less noticeable than the full stride that would be required from the sword-foot-forward stance. However, the tactical situation might well overweigh the optimal efficiency.
Setup
The offside blows that result from this technique are very short-ranged, so it is necessary to use the shield pass to obtain the proper distance. Since the second blow is to the head, it is best set up by a low first blow to your sword side of your opponent. This will cause a commitment, and possible some movement, down and away from the target of the second blow.
The difficult part of the setup is that you must end up with your weight on your back foot, once the setup blow is struck. This is necessary to allow you to spring forward with your shield foot towards the target. Given this, it can be useful to execute the setup blow as a feint that actually strikes, rather than a full-force blow requiring a weight shift to the front foot.
Timing
This variation of the technique is best used from a medium-long range, when not actively engaged.
Execution
This variation of the technique is one, which requires you to totally commit to the motion. Essentially, you will take a very long, gliding step towards your opponent, with your body moving as if you were planning to do a Judo roll past him, on his shield side (remember that your opponent is fighting with the opposite hand). The blow actually lands while you are in the midst of this roll. The impact of the sword, and the probable impact of your shield on your opponent’s shield, will cause a slight pause in the rolling motion, allowing you to catch your balance with your right foot, which will have slid up close to your left foot, then moved behind and past, to be in position to catch you.
- Throw a forehand blow to the leg of your opponent on your forehand side.
- Move your weight a little more towards your sword foot than usual, and bend that leg slightly, to “load” it to push you forward into a longer step with your shield foot.
- Start the side return.
- As your blade moves back, take a long, gliding step with your shield foot towards a point just outside of your opponent’s shield shoulder (remembering that you are fighting an opposite-handed opponent).
- The blade should be thrown wide, to the sword side, about 30 to 45 degrees from straight back.
- Your abdominal muscles should be tight during the entire technique. In fact, your whole body, above the hips, should be nearly rigid, except for the necessary movement of the arms.
- When the blade reaches the furthest back point, which should be about 30 degrees towards your sword side of being straight back:
- Lean towards your shield shoulder, while rotating slightly more clockwise with your hips. You should be leaning exactly away from where the sword is pointing.
- Bend your sword arm to “curl” the sword towards your head.
- The tip will continue around towards the shield side of your body.
- Your hand should be moving towards your head in such a way that it would hit you in the face, if you looked back at it.
- At the point where your hand almost reaches your head:
- Your sword elbow will start to lift up. Let it do so, and accentuate the movement.
- This will stop the forward motion of your hand. Make sure this happens.
- The sword hand will stop in front of your face, at about eye level. If it moves much farther forward, the force of the blow will be reduced.
- Rotate your shield shoulder further, in a clockwise direction (if you are right-handed).
- The blade will pass over, and in front of your head.
- This is possible, because you will be leaning away from the blade.
- Try to continue to lean forward and past your opponent, with your shield shoulder leading. Try to make your second step (with your sword foot) as late in the technique as possible, preferably not until after your second blow has struck.
- Allow your back foot to come off of the ground, and move towards your other foot, with the two dragging. You will be balanced on your shield foot.
- You can allow your shield to push into your opponent’s shield in a sliding press.
- Your motion will carry you to your opponent’s sword side, and your momentum should carry you past him.
- The target is your opponent’s helm, just in back of the ear. You should be in a controlled fall, when you strike.
- The impact of the blade hitting the target will arrest your forward momentum, allowing you to catch your balance by moving your sword foot behind and past your shield foot.
Variation 1b – Horizontal Standing
Description
This variation is most useful when used against any opponent. Its purpose is to get the blade to the second strike very quickly, but with power. Your weight will shift from your sword foot to your shield foot, but you retain your position. It is quicker when the targets of both strikes are high, but it can be effectively used in a low-to-high combination. It can also involve a shield punch or snatch. This variation uses a horizontal plane for the transition between the two blows. It does require a commitment of weight to the shield foot, but the commitment is very much less than is required by variation 1a.
Stance
I prefer to use these techniques from my standard stance, but I believe it could be used with a stance that had the sword-foot forward.
Setup
The off-side blows that result from this technique are usually shorter ranged than the initial blow, so it is necessary to lean slightly in and to your shield side, with the shield shoulder leading, to obtain the proper distance. A short, sliding step would be useful, but if executed properly, the technique does not allow time for that. Since the effectiveness of this technique depends on the quickness of the transition between the blows, it is useful to keep both blows high, leaving the plane of the backswing in its initial position.
Timing
This variation of the technique is best used in the middle of a combination, or when rapidly closing from medium range.
Execution
- Throw a forehand blow to towards your opponent.
- Start the side return.
- As your blade moves back, it should be thrown wide, to the sword side, about 30 to 45 degrees from straight back.
- Do not let your arm fully extend to the back.
- Your abdominal muscles should be tight during the entire technique. In fact, your whole body, above the hips, should be nearly rigid, except for the necessary movement of the arms.
- When the blade reaches the furthest back point:
- Lean towards your shield shoulder, while rotating slightly more clockwise with your hips. You should be leaning exactly away from where the sword is pointing.
- Bend your sword arm to “curl” the sword towards your head.
- The tip will continue around towards the shield side of your body.
- Your hand should be moving towards your head in such a way that it would hit you in the face, if you looked back at it.
- At the point where your hand almost reaches your head:
- Your sword elbow will start to lift up. Let it do so, and accentuate the movement.
- This will stop the forward motion of your hand. Make sure this happens.
- The sword hand will stop in front of your face, at about eye level. If it moves much farther forward, the force of the blow will be reduced.
- Rotate your shield shoulder further, in a clockwise direction.
- The blade will pass over your head. This is possible, because you will be leaning away from the blade.
- Allow your weight to move from your back foot to the front foot, but do not allow the back foot to come completely off of the ground.
- It is possible to insert a quick shield punch, or even a shield snatch, just as the sword comes around the back corner, but this requires practice to develop the necessary movement and timing.
- The target should be your opponent’s helm.
- You will end up with most of your weight on your front foot. This allows you freedom to move your back foot, and can lead into effective following techniques, most notably, a slot-shot, or a simple forehand blow.
- Either of these can be executed quickly after the main technique, because the main attack leaves you about two thirds of the way into an overhead return.
- A wrap is also possible, but is more difficult because of the requirement of a commitment of your weight to your shield foot.
Variation 2 – Overhead to Body
Description
This variation is most useful when used against an opponent who fights with the same hand that you do. Its purpose is to produce a second strike very quickly, and with considerable power, to the offside body. Your weight will shift from your sword foot to your shield foot, but you retain your position. Since the second strike comes in at a downward angle of about 45 degrees, it must be set up with an initial blow towards a low target, to allow for an upward return of 45 degrees to define the swing plane. It can also involve a shield hook, which involves extending the leading edge of your shield into the blocking path of your opponent’s shield as it moves from the initial block to attempt to block the second, offside strike. It does require a commitment of weight to the shield foot, but the commitment is less than is required by either of the horizontal variations.
While I cannot say for certain that he developed this variation, I first noticed it being used to great effect by Duke Jade of Starfall, of the West.
|
|

Figure 30
|
|
Stance
I prefer to use these techniques from my standard stance, but I believe it could be used with a stance that had the sword-foot forward. In the latter case, the footwork, described below, would have to be modified.
Setup
The offside blows that result from this technique are very much shorter ranged than the initial blow, so it is necessary to use some footwork to obtain the proper distance. In addition, the first blow is more of a feint that lands, rather than a full-force blow.
Timing
This variation of the technique is best used either when you are in middle sword range, or at longer range as part of a combination which quickly closes the range.
Execution
- If you are not already in middle range, use a short, sliding step with your shield foot, while throwing the initial strike towards your opponent’s leg. (If you start the combination from middle range, the slide step may or may not be necessary.)
- Immediately recover the sword foot, so it moves up very close behind your shield foot. (If you start the combination from middle range, the recovery step will not be necessary.)
- Start the side return while executing another short, sliding step with your shield foot. This should get you into the proper range. (If you start the combination from middle range, the slide step will likely not be necessary.)
- As your blade moves back, it should be thrown wide, to the sword side, about 30 to 45 degrees from straight back.
- Do not let your arm fully extend to the back.
- Your abdominal muscles should be tight during the entire technique. In fact, your whole body, above the hips, should be nearly rigid, except for the necessary movement of the arms.
- When the blade reaches the furthest back point:
- Lean towards your shield shoulder, while rotating slightly more clockwise with your hips. You should be leaning exactly away from where the sword is pointing.
- Bend your sword arm to “curl” the sword towards your head.
- The tip will continue around towards the shield side of your body.
- Your hand should be moving towards your head in such a way that it would hit you in the face, if you looked back at it.
- If, at this point, you are going to use the shield block, as noted in the description, above, you should start opening your shield, eventually pointing the leading edge towards the sword side of your opponent’s body. Don’t move it over any further, or you will interfere with your second strike. Don’t extend your arm, either, or you will hit your opponent with your shield.
- At the point where your hand almost reaches your head:
- Your sword elbow will start to lift up. Let it do so, and accentuate the movement.
- This will stop the forward motion of your hand. Make sure this happens.
- The sword hand will stop in front of your face, at about eye level. If it moves much farther forward, the force of the blow will be reduced.
- Rotate your shield shoulder further, in a clockwise direction.
- The blade will pass over your head. This is possible, because you will be leaning away from the blade.
- Allow your weight to move from your back foot to the front foot, but do not allow the back foot to come completely off of the ground.
- The target should be your opponent’s offside ribs.
- You will end up with most of your weight on your front foot, but not as much as with variation 1b. This allows you freedom to move your back foot, and can lead into effective following techniques described in variation 1b. Since the weight commitment to the shield foot is less, it is easier to step in with your sword foot, following execution of the second strike (if you wish to do so).
Variation 3 – Overhead to the Upper Back
Description
This variation is most useful when used against an opponent who fights with the opposite hand from you. Its purpose is to produce a quick, powerful second strike coming from a radically different angle from the first strike. The initial blow is struck forehand to the lower leg on your opponent’s sword side. The second strike is to the upper back, on your opponent’s shield side. This second strike is performed with a tip-down, vertical blade.
While I cannot say for certain that he developed this variation, I first noticed it being used to great effect by Duke Anton Tremaine, of Atlantia.
Stance
I prefer to use these techniques from my standard stance, but I believe it could be used with a stance that had the sword-foot forward.
Setup
The offside blows that result from this technique are very much shorter ranged than the initial blow, so it is necessary to use some footwork to obtain the proper distance. In fact, your shield shoulder should almost be touching. In addition, the first blow is a feint that never actually lands, but rather, it is pulled immediately into a vertical, upward return, which defines the plane of the sword path.
Timing
This variation of the technique is best used when you are at long range as part of a combination, which quickly closes the range.
Execution
- It is necessary to move in very close, during the first strike. Use a long, sliding step with your shield foot, while throwing the initial, forehand strike towards your opponent’s leg.
- The strike is actually a feint that does not land. The blade should be pulled up, through a sharp curve into a vertical, upward path, as it crosses, approximately, halfway to the target.
- The initial blow cannot be thrown with full power, or it will be very difficult, if not impossible, to curve the blade up.
- The method to use to curve the blade is to pull your sword elbow in close to, and in front of, your body. At the same time, curl your sword hand so that, if opened, the palm would face you.
- As you curl the blade up, allow your back foot to come off of the ground. It will pass behind your front foot; so start turning your body slightly in a clockwise direction (if you are right-handed).
- Your sword hand should move up to the point where it is about level with your forehead, and about six inches in front of your face. Without pausing, and at the same time:
- Turn your body strongly clockwise (if you are right-handed).
- Continue your step with your sword foot, closing the distance so that your shield is pressing on the outside edge of your opponent’s shield.
- Stop the upward motion of the sword hand by allowing your sword elbow to rotate up and out from your body on your sword side.
- This will transfer the center of rotation of the sword from the middle of your body, to your hand, thereby reducing the radius of rotation, and causing the sword to speed up.
- The clockwise turning of your body, combined with the weight shift towards your sword foot (which should be moving past, and in back of, your shield foot, will provide considerable leverage to cause the tip of the sword to rise very quickly.
- The tip of the sword will quickly pass through the top of its arc, and move even more quickly down the other side.
- The clockwise rotation of your body will cause a slight precession of the plane of the blow, allowing the blade to impact on your opponent’s upper back, in the vicinity of the scapula of the shield shoulder.
- Your shield should, at the same time, be pressing into and across your opponent’s shield, possibly turning your opponent slightly counter-clockwise so that the target is more accessible.
- Your weight should be entirely on your shield foot. Your sword foot does not touch the ground until just after the blow lands.
- From here, you have a choice of following techniques.
- You can pull your blade back, over your head, in a looping backswing, and then strike an overhead blow towards your opponent’s head.
- This takes advantage of the positioning of your sword foot.
- As you swing, your shield foot should start to move out and to your left, and farther behind your opponent.
- You can pull your blade back over your head, allowing the tip to drop behind your back. This will cause your sword elbow to rise. As you start to move your shield foot out and to the left, pull the elbow down and across your chest, while turning your sword hip quickly in the same direction. This will produce a quick, hard vertical blow.
|
)
)
)
)
)
)