SWORD
Physics
There is an article of mine in the Known World Handbook. Please refer to that for a discussion on this topic.
Stance
There are three factors to consider when choosing a position in which to hold your sword: the balance point of the sword, the position of the muscle in the front of the shoulder, and any tactical consideration.
- Swords have a balance point. When starting a sword swing, it is easier to get the sword moving if the balance point is closer to the center of rotation of your body. As an illustration, start a strike with the sword on your shoulder. Start another strike with your arm fully extended to the side. It will be much more difficult in the latter case. With this in mind, for maximum efficiency, the position of the sword in a resting, or "ready" position should have the balance point at, or just behind, the center of the body.
- The power being generated for a sword strike generally starts with the legs, and is transferred and amplified as it moves up the body into the arm. After the abdomen, the next most critical transfer point is the shoulder. The muscle in the front of the shoulder must be tight to transfer and amplify the force. If it is slack when the power arrives, the torso will have to rotate some distance until that muscle becomes tight. This will delay the movement of the sword, and decrease the efficiency of the power transfer. With this in mind, for maximum efficiency, the position of the sword arm in a "ready" position should be such that the muscle in front of the shoulder is tight.
- In my mind, the most important tactical consideration involved in the starting position of the sword is the availability of targets. For instance, if the sword is held vertically down the back, especially if the fingers on the sword hand are loose, the possible lines of attack will be limited to those close to vertical.
There is considerable latitude for personal choice, here. I prefer the sword in a diagonal position, with the sword hand oriented palm forward. This allows me to reach any target on either side of my opponent. Other choices can be made. Also, some people opt to use the sword as a static defense, at the expense of offense. My opinion is that this is an option that limits overall capability.
The position I recommend is as follows:
- The shoulders should be oriented so that the line through them is about 30 degrees from being on the line towards the opponent.
- The sword elbow should be nearly as high as the shoulder, and far enough back that the muscle in front of the sword shoulder is tight.
- The sword hand is over the shoulder, palm nearly forward, and close enough to the head that the ear can be touched with the knuckle of the forefinger.
- The sword rests on the upper back, just below the lower cervical vertebrae, pointing across the back about 30 to 45 degrees from horizontal.
'Snap' Techniques (strikes from a resting or "ready" position)
Primarily, the basic technique is to use the rotational momentum of your body gained from:
- A forward thrust with the back leg, accompanied by
- The bending of the front knee
- Amplified by;
- The forward movement of the sword hip, accompanied by a small backward movement with the shield hip; essentially, a rotation of the hips towards the shield side.
- This is accompanied by a slight backward lean of the shoulders.
- The tightening of the abdominal muscles
- The backward pull of the shield shoulder and arm
- The properly timed movement of weight to the front foot
- The forward pull of the sword shoulder and arm, accompanied by
- The movement of the sword elbow forward, slightly down, and across the chest. The elbow should move on the same timing as the hip. Please see Figure 2b, below.
- The movement of the sword hand directly from the shoulder towards the target. Please see Figure 2c, below.
- The rotation of the sword hand from palm forward to palm up, lead by the knuckles of the little finger, whipping the sword straight towards the opponent. Please see Figure 2d, below.
|
|
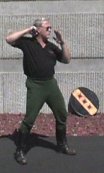
Figure 2a
|
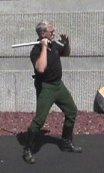
Figure 2b
|
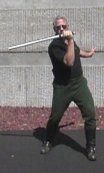
Figure 2c
|
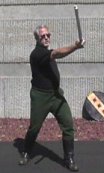
Figure 2d
|
|
Actually, the technique throws the balance point of the sword directly at the target, being more of a punch or a throw than a swing. However, since the sword is a line rather than a point, at some point in the motion, it "whips" around the corner, towards the target.
The sword is held initially so that the center of balance is behind the head, and therefore at the center of rotation. This negates any negative effect the forward balance of the sword might have. The sword hand is kept in by the head during the swing for the same reason. It is only at the end of the swing that the balance point of the sword moves forward. It does not move to the side except as necessary to move around the head towards the target.
Secondarily, the technique requires:
- That the motion of any part of the body remain in a forward-to-back channel of approximately the width of the shoulders
- The back muscles, as well as the stomach muscles, should be tensed
- The muscle in front of the point of your shoulder should start in a tensed, stretched position. This will require the elbow to start back and high.
- The sword hand should turn palm up, with the elbow leading strongly before the sword hand moves off of the shoulder. The hand should remain over the shoulder and as close to the head as possible until late in the swing.
- The elbow should be kept in close to the body during the first parts of the swing, unless you are a relatively small person, then it should swing out more, to gain kinetic energy.
- As the movement progresses, your weight should be balanced, but slightly on your back foot. The backward movement of your shield shoulder should have balanced the forward movement of the sword shoulder, and the forward motion of the knee and hips should have been balanced by the slight backward movement of the shoulders.
- DO NOT start or end leaning in any direction.
The snap as delivered in a learning technique should cause a flat (horizontal) sword swing, moving slightly up. This emphasizes the use of the lower body in the movement. In the combat technique, the hand moves in a similar motion, but the blade should be at an angle, pointing 30 to 45 degrees up. The fastest snaps will still be the flat ones, but they are easier to block.
When practicing the technique without a shield, the shield hand should move as far back and around as possible, while the shield arm extends fully, ending up pointed back and down at about a 45-degree angle, with the shield hand open, and palm forward.
Teaching Analogs
Most of these analogs use a controlled movement of the sword hand to cause the student to perform the proper movements with the other parts of the body. Usually it is necessary to supplement these controlled movements with directions to move other parts of the body in certain ways at the appropriate times.
Flat Hand
- With the student in a fighting stance, with no sword, have the sword hand held open, with the back flat against the ear, and the fingers extended, and pointing forward. Insure that the elbow starts and remains back and high. Start moving the hand in a circle which is on the plane formed by the hand itself. The motion should be up and forward, and down and back (counter-clockwise for right-handers as you look at them from the side). The ear should be at the center of the circle, and the back of the hand should nearly brush against it while moving.
- The shield arm should be bent, forearm horizontal, and across the chest with the shield hand close to the collarbone of the sword shoulder.
- Once the motion has been established, perform the exercise as follows:
- Stop the hand at the top of the top of the circle. The elbow should be back and high.
- Move it to the back of the circle, keeping the wrist straight, but turning the palm forward. The hand should be behind the ear, and the elbow should be back, but pointing down.
- Continue the circle, keeping the wrist straight, but turning the hand palm up at the bottom of the circle. The elbow should be pointed forward and slightly down, and the sword-shoulder should drop slightly. The hand should be no further forward than the ear, and the thumb should be almost touching the ear or neck.
- As the hand moves from the back to the bottom of the circle, the knees should both move forward (bent), and the sword-hip should also move forward and slightly around to the shield side.
- As the sword-hip moves forward, the shield hand should pull across the chest, and eventually move to a point which is down at a 45 degree angle, back, and towards the back heel, with the shield arm fully extended. The hand should end up with the fingers extended, and palm forward. This rotates the upper body so that the sword elbow and hand can move directly towards the target.
- When the hand has reached the bottom of the circle, stop it there while the hips rotate to the point where it is possible to look directly over the sword-hand while looking at the target. The elbow should have rotated past the line to the target. The hand still should be on the shoulder, close to the head. Now move the hand directly towards the target with the palm up.
- At the end of the swing, the weight should be slightly to the rear foot, but the front knee should be bent at least as far as the front toes. The stomach and hips should be forward and rotated so that the navel points towards the opponent, the shoulders back, and the arms extended in opposite directions. The entire body should be balanced, even though the feet may be rotated up on the front sides. Do not allow the feet to spin on the ground.
Finger Push
- Stand on the sword side of the student, holding your hand on the front edge of his sword hand, having your palm open, and nearly vertical, and just leaning its top edge towards his hand.
- As he starts the slow movement, push lightly down and back. Do not push hard.
- Require that the student move so as to roll around your hand and avoid the direct pressure.
- Insure that the front knee is bent and extended over the front toe.
Speed Exercise
There are two kinds of speed; pure physical speed, and effective speed. The latter has three components; physical speed, technique, and timing. It is possible to increase physical speed slightly, but it is difficult to do so. Technique can be practiced and improved, and it greatly affects effective speed. Timing can also be improved, and can have an even greater effect.
The process to improve timing requires practice to perceive the openings and the cues that indicate the openings are about to occur. A combination of slow work and supervised fast work is generally effective in this respect.
Technique can be improved with a combination of structured movement exercises, and pell work. Start the pell work slow, and gradually allow the speed to increase. Watch for deterioration of the technique as the speed increases. Notice both the overall movement, and various aspects, such as bending the front knee, keeping the hand close, etc.
One exercise, which may help to improve overall speed, is to have someone stand behind the pell with a sword. Have them hold the sword out at head level so that the student can grab it with the shield hand. Have the student squeeze as hard as possible, and close his eyes. Keep the eyes shut for the remainder of the exercise.
- After a few moments, have the student release the hand, but remain aware of the sensation in the hand that remains.
- The student should then pull the shield hand back towards himself or herself, visualizing an elastic band between that hand, and the instructor's sword.
- On the path back, the hand should pass over the sword hilt of his won sword. At this point, have the student imagine that the elastic cord is being attached to the sword.
- Have the student imagine that the cord is pulling harder and harder.
- At some point, the student should release the sword, while visualizing that the sword has instantaneously appeared at the target; not that it moved, but that it is there.
- Repeat the exercise a few times. Do not expect any changes in speed to be retained. Repeat the exercise at other practices, along with the technique described above.
Variations
Right Cross
- This technique is performed as a normal snap, but with the target moved to the opposite shoulder. The elbow should lead strongly, and the blade MUST strike at a 45-degree angle. This has the effect of moving the path of attack over. The blow will strike higher on the helm, and closer to the tip of the blade. However, since the blade is at an angle, it still strikes properly.
- This technique can be varied by both stepping slightly forward and to the shield side during the strike.
- Similar results can be achieved by leaning the only the hips to the shield side, and over-rotating the hips. The shoulders should lean slightly back, but rotate more than normal. It is possible that this will cause you to end up on the shield-side edges of your feet, for an instant.
Wavy
- With the sword at rest, move the sword-hand directly up, such that the hand is just higher than the helmet.
- At the same time, use the fingers of the sword-hand to quickly point the tip of the sword directly at the face of the opponent. Do not move the hand forward. Please see Figure 3b, below.
- At the same time, rotate your shoulders (clockwise, if right-handed) slightly.
- When the tip of the sword comes into sight over the front of the helmet, throw a snap, using proper technique, towards the head of your opponent. The blade should hit at about a 45-degree angle.
- Remember that the technique is a count-and-a-half movement, with a slight hesitation when the sword tip is forward.
Rising
- With the sword at rest, bend at the waist sideways towards your sword foot. Do not lean back, and do not allow the abdominal muscles to loosen.
- At the same time, slide the hilt of your sword down and to the same side. It should be moved down at about a 45 degree angle, and in such a way that the sword blade slides across the shoulder, but does not move off of it. Do not move the sword hilt forwards. Please see Figure 3c, below.
- When the bend and hand movement have reached the lowest point (the point where the sword cannot be moved more without loosening the fingers), throw a snap, but leading up strongly up and across with the elbow, and moving the hip strongly forward and around towards the shield side. This should have the effect of having the tip move down, and then up. The difference in the low and high points of the tip should be several feet. Again, this is a count-and-a-half move, with the hesitation at the low point in the bend. Please see Figure 3d, below.
Wavy-Rising
The two techniques described above can be combined. At the point in the wavy technique, instead of throwing the snap, go into the rising technique.
Drop
The drop swing should be used at slightly closer range than the others. Simply drop the sword hand off of the shoulder, causing the hand to turn palm up, and to move slightly forward. This provides a flat blow just at the bottom of the thigh. This blow should be practiced enough that it hits on target without benefit of direct vision. It can be varied by making the hand turn palm down, whipping the sword into a wrap, while perhaps stepping slightly forward.
|
|
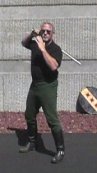
Figure 3a
|
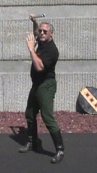
Figure 3b
|

Figure 3c
|
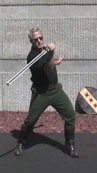
Figure 3d
|
|
Arm
This blow strikes the arm, crossing the arm at about 30 degrees from the line formed by the length of the arm. Swing a snap, keeping the elbow out while starting the swing, and then try to bring it across the chest. Instead of flattening out the blow, try to keep the blade vertical. The effect will be that the tip of the blade will be pulled out from vertical by centrifugal force, moving further out as the swing progresses. This will allow the blade to miss the shield on the swing. The blow is reasonably safe, since its power is easily controlled, and the sword does not cross the arm at a right angle.
Punch
The punch is most useful against a charge, or while fighting from the knees. In either case, if the opponent opens his shield slightly as he advances, use a snapping technique similar to the arm blow as described above. In this case, do not move the elbow across the chest, but have it move straight out. Aim for the center of the face, (or chest, if you are on your knees) and time the blow so that it just barely clears the edge of the shield as the shield opens with the advance. The blade is vertical at impact, and the strike is fairly low on the sword. It does deliver a jarring impact, and can be very surprising. Do not swing down, but punch directly out.
Return Techniques
These are techniques by which the sword is retrieved from a strike, brought back behind the body so that force can be generated for the next strike, launched on the next strike. While there are many instances where individual strikes occur, it is neither necessary nor useful to return the sword to your shoulder between strikes. Combinations of blows are generally more effective than individual blows. The return techniques described below are designed to aid in throwing these combinations.
There are two main types of returns; the side return, and the overhead return. There is also one I call the push through return.
Side Return (Full Teardrop Return)
The side return is probably more useful than the overhead, since it can be used to deliver blows to any target on the opponent, whereas the overhead return restricts the choices available for the next blow. This technique is used after forehand blows which are stopped by the opponent, or overhead blows where the sword is not entirely stopped.
|
|
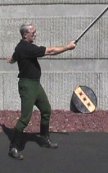
Figure 4a
|
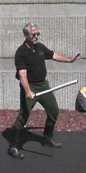
Figure 4b
|

Figure 4c
|
|
|
|
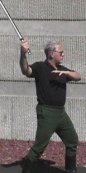
Figure 4d
|
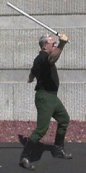
Figure 4e
|
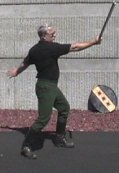
Figure 4f
|
|
In general, blade is pulled back and down around the sword side, pulled around and up through a curve behind and to the sword side, and pulled forward towards a target. Unless the next strike is towards a low target, the sword hand, on its way forward, should pass through a point just outside and over the sword shoulder. The path of the sword is generally that of a large teardrop (with the teardrop lying on its side, with the point forward, and the rounded behind the fighter.)
A critical aspect of this movement is the proper timing of the hip rotation. The rotation of the hips around towards the sword side provides much of the impetus to the return of the sword. The rotation of the hips around towards the shield side provides much of the impetus for the subsequent strike.
- The point at which the one rotation changes to the other is very important in determining the efficiency and speed of the return. This point is when the sword hand passes by the hips on its rearward path. If the hips rotate farther back on the return, the upper body can be turned away from the opponent, the path of the sword is lengthened, and it becomes difficult to keep the sword from flipping to the shield side, causing unnecessary motion.
- The timing with which the power from the rotating hips, especially during the subsequent blow, is also very important. The power applied by the hip rotation should be uniform from the time when the sword starts its forward motion, to a point just after it passes over the sword shoulder. If the hip rotates too quickly, either the abdominal connection between the upper and lower body will be lost, or the sword tip will drop strongly as the hand quickly starts its forward motion. In the former case, power is lost as the contribution of the lower body is lost. In the latter case, the lowered tip acts as a brake, requiring the power to be re-applied by the shoulder. If the hip rotates too slowly, it will not contribute significantly to the power of the blow.
It should be noted that while the muscles that cause hip rotation are engaged during the full-speed execution of these techniques, the hip itself does not actually rotate much. It is only during the slow-speed practice or these techniques that a lot of rotation occurs. There are, of course, some techniques that are exceptions in this respect.
One of the major objectives of this technique is to avoid unnecessary motion of the sword while it is behind your back. This is accomplished by keeping the sword to the sword side of your body, rather than allowing it to move behind your body towards your shield side.
The technique is performed as follows:
- The blade is pulled back and slightly down. During the initial part of the return, it is pulled directly along the axis of the blade. This both takes advantage of the downward pull of gravity, and avoids having to 'muscle' the blade into a sideways rotation. Please see Figure 4b, above.
- The pull should be generated more with the hips and legs than with your arm. The hips are not pulled straight back, but are rotated around in a clockwise direction (for right-handed fighters), while the front leg pushes. This allows your larger leg, back, and abdomen muscles to do the work.
- The shoulders should lean slightly away from the sword during this time. The lean is very slight, and is actually more of a direction of pull for the muscles of the upper body.
- The front leg should not straighten completely, and knee should move sideways towards the sword side as it pushes.
- As the sword is pulled back,
- Your hand should move to a palm-down position.
- The sword elbow should be within a few inches of side. Do not allow the elbow to pull farther back than your hip, because it will cause the arm to be moved into a position where the sword hand is trapped under and inside of the shoulder. If this occurs, it becomes necessary to use a wrist flip to turn the sword over so that it can move back. This makes the plane of the swing more horizontal, forcing the tip of the blade to the shield side, behind the body.
- As the sword hand move past a point directly to the sword side (a line that is perpendicular to the line of advance, which I refer to as the 'side line', the backward rotation of the hips is halted. The rotation halts, and the muscles of body, starting with the lower body, start to slowly pull forward. The actual forward rotation of the hips starts about the time the sword hand moves up to the height of the waist, following the curve upwards. (Please see Figure 4b, above.) This does many things:
- It helps turn the sword and your hand over at the proper time.
- It engages the muscles on your shield side earlier to help pull forward.
- It moves the path of the backswing more towards your sword-side, helping to keep it 'outside' of your body.
- It moves the arm and shoulder more quickly into the 'locked' position needed for the technique.
- As the body turns, the hand is forced out from the body, assisting the sword to swing out and around.
- As the hips start their forward motion, the hand should move back with the movement of the sword, leaving the elbow as far forward as possible.
- As the sword hand crosses the 'side line':
- The hand turns from palm-down to palm-up. As this occurs, the wrist is locked into a position similar to that of an Aikido wristlock as it lifts up and pulls forward. To accomplish this, the little finger of the hand should curl strongly across the palm. The hand should move so that the tip of the sword starts towards a point about 30 degrees towards the shield side of directly back.
- It is important to lift up with your index finger as the sword starts moving up behind your back. The tip of the blade should be level with your hand as the sword passes through the horizontal. (Please see Figure 4c, above.) The tip should be higher after that.
- If the tip is too low, the upward pull of the hand later in the swing becomes too pronounced, making the tip drag even more. This slows down the swing, and limits the angle of attack of the subsequent blow to nearly vertical.
- This technique does require some arm strength. If you are unable to do it correctly at fast speed, modify it so that the tip of the sword rises no higher than your hand, and points directly back from the hand. This lessens the strength required.
- In the slow motion practice, the sword really has no momentum, so the hand must push back to simulate this. At its farthest point back, the tip should be pointed up (but short of vertical) and back, with the hand higher than your head. Please see Figure 4b, above.
- While the sword is following the curve behind your back:
- Continue to push up with the sword hand.
- Start bending the elbow more, to reduce the radius of rotation (and speed up the sword.)
- Cause the hand to rise to head height (top of head in slow practice, to the chin in fast work). The hand and sword hilt should be just outside the shoulder at this time. Please see Figure 4e, above.
- The hips should complete the forward rotation between the time the sword hand starts moving back, away from the hips, and when the hand crosses the shoulder on its forward path. It is important to apply the power smoothly over this interval. It is VERY important not to fully move the hips too soon or too quickly.
- The hand passes over the shoulder in approximately the same position for every blow (except for very low targets). It is the point of maximum efficiency, and disguises the next strike.
- The hips should already be fully moved, and the hand and arm should now extend directly towards the target.
- It is very important that the tip of the sword remain to the sword side of the body. In other words, it should not wave behind your body, but rather should stay outside of your shoulder. Any movement of the tip of the sword crossing to the shield side of directly back will necessitate unnecessary motion, and delay the next blow.
Strike Direction
As the hand passes over the shoulder forwards, extend the hand directly towards the target. If the target is on your sword side, guide as if pointing with your index finger. If the target is on your shield side, guide as if pointing with your thumb. The latter will cause the hand to start to turn palm down, causing the sword to move to your opponent's sword side.
Half Teardrop Return
The half teardrop is a variation of the side return that is useful for fighters who lack the arm strength to pull the sword around the upward curve in the back of the teardrop. To describe the path of the sword hand during this technique, imagine the same large teardrop as in the standard side return. Cut the teardrop in half, horizontally. Smooth out the curve on the back end so that it smoothly meets the horizontal line. Adjust the teardrop so that the horizontal line is at the same height as your sword shoulder.
Much of the angular momentum of the sword is converted (or shed entirely – I don’t know) to a straight vector along the long axis of the sword, as it moves around the back curve into the horizontal line. The momentum is converted back into angular movement at the end of the technique, producing a blow of surprising power. The overall speed is close to that of the standard teardrop.
The advantage of this is that when the angular momentum is converted, the sword becomes very much easier to pull.
To perform the technique:
- You start the return in the same manner as the standard teardrop.
- As the sword starts up the back curve, you pull the sword elbow strongly inward and forward, so that the elbow passes close to the body as it moves forward, followed closely by the sword hand, which comes up to shoulder height.
- The sword is pulled smoothly into the horizontal line, with the tip pointed straight back.
- The elbow follows closely to the forward movement of the sword hip. The stomach muscles should be strongly tightened, to connect the hip with the upper body.
- As the elbow passes in front of your body, it should move across your chest, towards the shield side of your body.
- This allows your hand to move straight forward, out from your shoulder, towards the target.
- When the hand reaches the limit of its extension, it will start to move inward, towards the shield side. This will cause the momentum of the sword to flow towards the tip, and the sword will quickly accellerate around, in a horizontal plane, towards the target.
It is extremely important, when practicing this technique, to get to the point where the sword moves precisely into the horizontal line. Any deviation reduces the effectiveness of the blow. I suggest practicing while using a mirror.
Overhead Return
This technique is used after forehand blows that has missed the opponent, and continues past on a high line, or an overhead blows where the sword is entirely stopped in such a way that it would be difficult, or slow, to perform a side return.
In general, the sword hand is pulled directly back over the sword shoulder, to a point behind, over, and outside of the sword shoulder. At the farthest back point, the hand should be at the level of the top of your head, with your arm forming an approximate right angle, with your forearm just past vertical.
If the return is performed when the sword has been stopped by the opponent, the blade is pulled back along its own length. If the return is performed when a forehand blow has missed high, the blade passes back horizontally over your head, with the tip pointing towards your shield side.
|
|
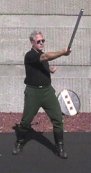
Figure 5a
|
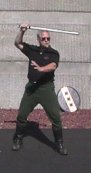
Figure 5b
|
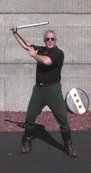
Figure 5c
|
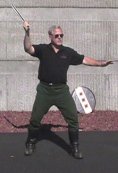
Figure 5d
|
|
|
|
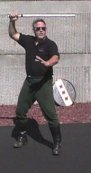
Figure 6
|
|
Push-Through Return
This type of return is often seen in a fast, low-power form, characterized by the sword hand being held in front of the head, and the horizontal sword alternating strikes from either side. My version is considerable powerful, and I use it only to perform overhead strikes after forehand blows. If I wish to continue with another forehand, I use on overhead return.
In general, the technique consists of pushing the sword elbow farther across the body towards the shield side, after the blade has impacted on a high target. The sword hip follows the sword elbow. When the elbow has crossed under the sword hand, which remains relatively stable during this, the body and arm are cocked to supply power for a backhand strike that is delivered by moving the sword elbow quickly towards the sword side, and rotating the sword hip back. The target can be either high or low.
|
|
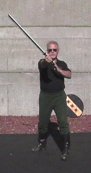
Figure 7a
|
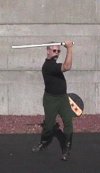
Figure 7b
|
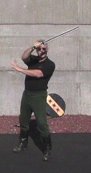
Figure 7c
|
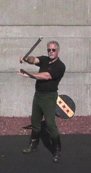
Figure 7d
|
|
Once the sword blade has impacted from a high forehand strike, the technique is performed in the following manner:
- At the same time; (Please see Figure 7a, above.)
- Pull the sword hand slightly towards your head, with the palm facing you.
- Push the sword elbow farther towards your shield side, passing four to eight inches past the hand.
- Pull back with the shield shoulder.
- Rotate the sword hip counter-clockwise towards the shield side.
- Then, at the same time; (Please see Figure 7b, above.)
- Pull the sword elbow sharply across the front of your body towards your sword side. The direction of the path of the elbow directs the blade towards the next target.
- Rotate the hips clockwise.
- Rotate your shoulders clockwise. Be careful not to get your shield out of position.
- Extend your sword arm so that the hand moves forward and past the intended target. If you don't extend the arm, the strike turns into a slash, and may not deliver sufficient power. Please see Figures 7c and 7d, above.
Advanced Strike/Returns
Sword-side Attacks
From Rest
Attacks which start with the sword at rest generally will be comparatively slow and weak. The main power is generated from the rotation of the hips, and the thrust of the arm coming forward. However, they lack the whipping effect of the extension of the arm with the elbow leading the hand, since the hand leads in these techniques.
Strikes to lower targets are stronger, since the sword moves in a longer path, allowing more drive from the hip and shoulder. Strikes to high targets are rarely strong enough to count, unless the attacker is very powerful, or a supplemental technique is used, such as a preliminary arm motion, or a step.
The basic technique from rest is to turn the body slightly to the shield side, perhaps also leaning the head slightly in that direction, while leading with the hand and driving strongly with the hips and shoulder, as if with a snap. On this type of blow, be sure to aim to the target, rather than swinging through it.
A variation on this technique, which requires a preliminary motion, is:
- Turn the body more strongly towards the shield side, while moving the sword elbow across until it is nearly in front of your face. The elbow must be kept high.
- Pull the arm forward and sharply to the sword side, with the elbow leading the hand, and producing the whipping effect, but with the palm down.
- While this is occurring, the sword hand must lift enough for the sword to pass over your head.
- The shield hip drives this blow, with the sword hip pulling.
- The strikes produced by this technique are short range. If it is possible to rotate the sword shoulder and hip underneath the sword hand before the technique is started, the blows become much more accurate and powerful. However, the initial movement may lessen the surprise.
- This variant is best used as a second blow in a combination started with a high, first strike while closing somewhat with your opponent. Instead of going into a side or overhead return;
- Allow your blade to be stopped by your opponent's helm or shield.
- Keep the sword elbow of your partially extended arm high, and high, move it across your face towards your shield side. Move your sword shoulder some in the same directions.
- Execute the variant technique.
- Blows of this nature may be directed up or down by dipping or raising the shield shoulder.
From Moving Blade
A variation of the sword-side attacks as described in the returns section above can be used to deliver blows from a very wide angle to the opponents sword-side; even to the back leg. The angle from which the attack occurs is useful in avoiding the shield. This technique is also very useful when using a no-dachi (Japanese great sword).
To perform this technique, follow this sequence:
- Use the normal side return.
- When the sword is moving back and up, allow the arm to extend, rather than pulling it in to increase the forward speed.
- When the sword points straight back and the arm starts to move forward, start rotating the body much more to the shield side then normal. As the forward motion of the sword progresses, strongly move your sword shoulder across your front towards the shield side.
- As the sword starts to descend towards the target, the body should have rotated enough so that the chest and sword-shoulder muscles are tight, and can be used to pull the sword as the body continues to rotate towards the shield side. If you rotate too fast, this pull will be lost. As the sword continues to descend, continue to rotate until you are facing 90 degrees from your line of advance, and essentially swinging sideways.
- Direct the sword TO the target. Do not sweep through.
- Start your return immediately, so that you will have time to get your shield back in position. It is vital to keep your balance, and have your shield tucked in tight, so that it won't have to swing too far out on the next block.
Sweep Strikes
These are actually feints to the leg with either a forehand or backhand swing that, combined with a forward step and a shallow return, set up a quick, rising blow to the head. This technique is probably most useful in single-sword fights. To execute the technique, follow this sequence:
Forehand
- From just barely in range, start a forehand blow to the leg or a head blow traveling across and down. Use a right-cross technique, but aim just short of the target.
- When the blade approaches the target, pull the hilt slightly towards your chest, just enough to miss. At the same time, allow the blow to start pulling your back foot off the ground.
- After the blade crosses between you and your opponent, step forward with your back foot.
- At the same time start a standard return motion with your hips, but directed as if your rear is now directly towards your sword side.
- As the blade travels out to shield side, pull it up and around in a smooth curve, lifting with your hand, and pushing your thumb across your palm to turn the blade edge-on.
- Using the momentum of your step, and with the shield hip driving the blade forward, lead forward and across with your sword elbow, and push your sword hand directly to the front of your opponent’s helm.
Backhand
When starting the technique from an overhead blow instead of a forehand, simply reverse the technique as described above, returning the sword to the sword side (not back and to that side). It is better, in this case, to start with an overhead blow that is thrown with the sword hip forwards.
Backhand Reverses
This technique stops the downward path of the sword at about the level of the upper abdomen during an overhead blow to the leg. After pausing slightly for the opponent to react to the downward blow, the hips are reversed, and the sword is whipped up towards the opponent's helm.
This blow is probably most effective if thrown as part of a combination, so I will describe it as if doing so.
- Throw a normal forehand blow, preferably to the leg, and go into the normal side return.
- Continue the return, having the blade cross over the sword shoulder, on its path forward, and start across your face for a low, sword-side attack.
- After the blade has crossed your face and started down, with the hand at about the level of your upper abdomen, stop the blow. This should not be too difficult, since the blade is at this point almost vertical but trailing the hand. The energy of the sword will then move directly down the blade into the hand, where the arm can easily absorb it.
- At this time, move your hand down about two inches in a smooth curve towards the bottom edge of the hand, down so that the hand turns palm down, and then pull quickly forward and up, driving the sword towards your opponent's face.
- While doing this, rotate strongly forward with the shield hip, timing the greatest force to be applied just as the blade starts forward.
- At the same time, allow your shield shoulder to dip just slightly forward. This will assist your sword to move in a rising.
Drag Strikes
These techniques are most useful in single sword fighting after losing an arm, but they can be used in combinations while still using a shield. They are usually blows to the lower leg, but can be used for a headshot, like a super right cross.
The technique is executed by stepping to one side in the middle of the blow. For low strikes, this flattens the arc of the sword, allowing it to move under many blocks. For high strikes, it changes the angle of attack, making it a variation of the right cross. The step is also useful in positioning you for a different angle of attack on the next swing.
To perform the technique:
- Start your weight moving towards your shield side, lifting the front foot off of the ground and moving sideways, as you initiate a forehand snap to the leg or head.
- After striking, it is best to quickly return your blade, letting your back foot move towards the same direction. This will assist you in getting your shield around.
From my experience, the forehand leg blow is the most effective.
Both the high, forehand technique and the overhead technique are better used as part of a combination after an initial blow from the opposite side.
A great benefit of this technique when not using a shield is that it can be used both to move out of range of your opponent's next blow, and to set up a good angle for yours. In this situation, your blade is left somewhat behind you, as you continue moving in the direction of your initial step, in a good position for a tip-down, vertical block.
Wraps
These are blows thrown as a forehand strike, during which the sword hand turns over towards the inside. The back edge of the sword strikes. The angle of attack for these techniques can be from as low as 5 o'clock, and as high as 12 o'clock (12 o'clock being directly towards the opponent). Backhand wraps are possible, but I don't think that they are very efficient, and I don't use them.
In general, I believe that about 30% of a blows power is lost in most wrapping techniques, so this should be taken into consideration when choosing to use them.
There are three different varieties in my system:
Rolling Techniques
This is a 'mild' version of the wrap. It is used to gain two or three inches of perspective to avoid the shield. I only see limited utility in this technique. The payoff (the change in perspective), is seldom worth the cost (loss of power).
- As the forehand blow is thrown, the hand will turn from its 'at rest' position of palm down or palm forward to a roughly palm-up position.
- While this is happening, the knife-edge of the hand will lead as the hand turns and moves forward.
- During this turn the hand will pass through a position where the thumb is at the back, and oriented vertically.
- If you push forward with the thumb at this point, the hand will end the blow palm down with the blade striking on its back edge.
Whipping Techniques
These techniques are the more effective of the wrap varieties in that they regain some of the power lost initially, and therefor strike harder.
As in all wrapping techniques, some power is lost as the hand turns over, and the sword wraps around past 12 o'clock. This is because strikes produced with the snapping technique are basically punches, with the sword along for the ride. The power of these blows is directed to a target, not swung sideways through it. In the non-wrapping snap, the sword whips around, and impacts fairly close to the point at which the power is directed. The more distance between the power focus and the impact site, the weaker the blow. If the impact occurs in the swing before the sword reaches the power focus, the result tends towards being a push, but can still be powerful. If the impact occurs in the swing after the sword passes the power focus, the result is simply a weaker blow.
|
|
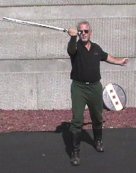
Figure 8a
|
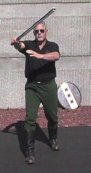
Figure 8b
|

Figure 8c
|
|
In the whipping techniques, a reasonable amount of additional power can be generated to be applied to a second power focus point that is farther along in the swing from the original focus. This is produced by two methods:
- As the blade travels forward, you can notice a sensation of the hand pulling the blade. In a wrap, just as the blade starts to go around the 12 o'clock corner, that sensation changes into one where the blade is pulling. At that point, power can be added by pulling back with the sword-side of the body. Please see Figure 8b, above.
- When you pull back, the sword hand should move somewhat towards your sword side. This has the effect of reducing the radius of rotation of the blade, and its kinetic energy is increased. It also has the useful effect of moving the impact point of the sword further out on the blade. Please see Figure 8c, above.
There are various styles of delivering the whipping wraps; and some experimentation is useful. These styles are similar in that:
- The hand turns palm down, and the back edge strikes. The turnover motion is similar to that of the rolling technique.
- During the forward motion of the sword, the sword hand must be aimed fairly close to the opponent, preferably reaching its nearest point when the sword hand is even with the opponent's head. I prefer about six to twelve inches away from the opponent's head. This is to cause the sword to be in the proper position to impact close to its tip when the sword hand is pulled sideways as the secondary power is applied. Please see Figure 8a, above.
- There is some motion rearward of the arm, or at least some rearward shift of weight as the sword wraps around the 12 o'clock point. The timing on this is critical. If applied too soon, the secondary power focus will occur in the swing before the sword impacts. The resulting strike is much weaker. If applied too late, the strike becomes more of a push. Also, the pull should be gradual, to apply power during the entire time of the whip around the corner. If you pull too quickly, the blade will be pulled sharply sideways, and the power lost. Please see Figures 8b and 8c, above.
- They are generally more effective if delivered after stepping in with the sword foot. The timing on this should be that the step leads the hip movement of the snap, but is not simultaneous.
Swinging Techniques
I do not particularly like these techniques. They are generally not as effective as the whip, and they can lead to bad habits, such as stepping in while you swing, instead of just before. They also inhibit correct returns, since the weight of the body is often committed to far forward.
This style includes many variations, several of which produce powerful strikes. The most popular of these is the "skywrap" or "scorpion". In this variation, the hand is stopped abruptly at its farthest extension, thereby changing the center of rotation from the body to the sword hand. The sword, with its newly decreased radius of rotation (without the extended arm) speeds up.
The negative aspect of these blows is that repeated application will likely injure the sword shoulder and elbow, possibly requiring corrective surgery.
They are similar to the whip, except that:
- The hand need not be as far forward for effectiveness, so a step is optional, but probably useful.
- The blade going out is moving as fast as possible.
- There is no, or a greatly reduced whip when the hand turns over, although most techniques are combinations of swing and whip, not one or the other.
Variation
Drop Strike
In this deceptive technique, the target is the lower back of the front leg. It is performed in this manner:
- From a normal stance, in range, allow the sword hand to drop straight down quickly from the shoulder.
- When the hand reaches the furthest downward point, flip the palm over by moving the elbow back slightly, while moving the hand forward.
- Allow the sword to whip around towards the target.
- Optionally, step forward during the swing to get better range.
|
)
)
)
)
)
)
)
)
)
)
)
)
)
)
)
)
)
)
)
)
)
)
)
)
)
)