SWORD EXERCISES
Pell Work
This is basically practicing striking techniques against a padded pole, or other target.
Most pell work should be done at a slow speed. It is useful to vary the speed, but full speed work should be minimal until you have techniques mastered. Your body cannot learn the techniques with any precision if the training is done at full speed. The movements will likely feel better if you do them quickly, but this is because the speed masks the mistakes.
The rule should be to learn slow, polish fast. If you try to learn fast, you end up with very polished errors.
Once you have learned to execute the techniques properly at slow speed, start increasing the speed and power. You will find that once you start applying power, the movements of the technique will become distorted. This may require returning to slow movement several times to modify the technique until it is useable fast. These returns to slow speed can be for just a few blows, if that accomplishes your purpose.
In addition to single-strike techniques, the pell can be very useful in developing combinations. The same guidelines concerning slow and fast practice apply here. When you are learning combinations, you may wish to actually write them down, so that you won't forget them from practice to practice.
It is also useful to combine shield work into your combination practice. Eventually, you can add movement, as if you were actually fighting an opponent. I suggest:
- Make six marks on the pell, three on each side, with one pair each at the temples, ribs, and lower thigh. Strips of colored tape or cloth are good, since they can be moved to provide varied targets.
- In addition to single-strike techniques, create a list of combinations, specifying targets, returns, and the type of blow being struck. Use the marks as targets for the blows of the combination.
- When you start using a shield with the combinations, block towards each of the marks in a determined order. The sequence of blocks can be the same as that of the strikes, or towards the opposite mark, or some more complicated sequence.
- Perform your 'sets' at least two times each. If you are doing more than two of each, it is better to go through each set two times, then go back through again, rather than doing four of each in a row.
The type of pell can vary considerably. A padded pole is the norm. However, I have seen pells constructed of automobile tires, modified and tied together to have arms, legs, and a head, as will as the body. I have used pells that incorporated a shield. A heavy rope, suspended from above, and weighted at the bottom, works fine, and can be used in conjunction with mirrors that allow you to see what you are doing.
One simple, but very effective version, that I once used was a pole with several tires fastened to it. The tires were not fastened flat against the pole, but were attached at a point on their rims, so that they stuck out from the pole. They were fastened at different heights, and on different sides of the pole. By positioning myself correctly, I could set up opportunities to practice strikes at odd angles.
Butterfly Walk
|
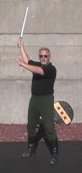
Figure 13a |
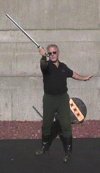
Figure 13b |

Figure 13c |

Figure 13d |
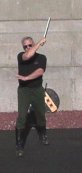
Figure 13e |
|
|

Figure 13f |
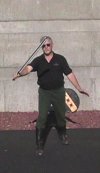
Figure 13g |
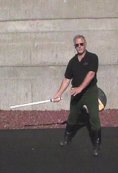
Figure 13h |
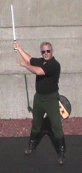
Figure 13i |
|
This exercise combines stepping and swinging the sword. A variant can be done using a pell, without walking. It provides a format in which to practice two techniques:
- The hip movement, timing, and body movement integration on returns and swings
- Accuracy
The basic movement of the exercise requires sword strikes to be made, alternating forehand and backhand strikes, both moving down and across the body at a 45-degree angle, passing through a target point at about eye-level.
"Teardrop" returns are executed to both sides after the strikes. It is important to emphasize that the path of the sword should be kept outside of the shoulders, and the tip of the sword should be above the hand after the sword crosses the horizontal, while pointing back.
The steps occur with the leg on the side to which the return is being made, timed to start when the sword hand reaches the area of the hip, after the strike. The steps act as a timing device, to practice moving the hip forward at the proper time in the backswing.
In addition, the movement of the sword is slowed during the strikes as the sword hand passes through the target. During this time, it is necessary to guide the blade so that all of it, from pommel to tip, passes through the target. This builds accuracy.
Of course, as in all slow exercises, the movements must be exaggerated in that you must reach as far back and up as possible on the returns, and have the sword, on its forward paths, cross over your shoulders at a point even with the top of your head. Also, move the shield hand as if to pull and push the sword (without touching it). Do not mimic the position used to hold a shield.
To perform the exercise:
- Start in a normal stance, but extend the sword arm back and up to point the tip of the sword back and up, nearly vertically, and at an angle about 30 degrees to the sword side of straight back. Please see Figure 13a, above.
- Cross your shield arm over your chest as if you will be pulling the sword with that hand also. Don't touch the sword.
- Start a strike towards the target (the bridge of your imaginary opponent's nose), leading with the hips and knees, and pulling across your chest with your shield arm. As the strike progresses, the shield arm should continue down and back at about the same angle of the sword strike. Please see Figure 13b, above.
- Just as the sword hand is about to reach the target, slow the movement considerably so that you can move the hand and the entire length of the sword precisely through the target. This will help increase your accuracy. Please see Figure 13c, above.
- As the sword tip passes through the target, go into a backhand version of the basic side (teardrop) return:
- The sword should move down past your left hip (Please see Figure 13d, above.)
- As the sword hand reaches the hip, start a step with the shield leg, and start the forward motion of the hip. The step should finish as the sword starts to rise up again.
- The forward rotation of the shield hip should complete when the sword passes back forward over the shield shoulder.
- The sword circles back and up.
- As the sword moves back and up, it is necessary to lift with the thumb, and curl it, and the hand, in a clockwise direction. This not only lifts the blade, but keeps the tip from moving across in back of you towards the sword side.
- The tip of the blade should be higher than the hand after the sword passes through the horizontal.
- The shield hand should start pushing forward as the sword starts to rise past the horizontal.
- The sword is then pulled forward for a backhand blow through the same target.
- As the sword hand moves forward over the shield shoulder, the hand should be, if possible, as high as the top of your head. Please see Figure 13e, above.
- The sword tip should be outside and above the sword hand.
- Continue the strike towards the target, again slowing the movement as the sword hand approaches the target. Please see Figure 13f, above.
- Carefully move the sword hand and entire length of the sword through the target, as during the forehand strike. Please see Figure 13g, above.
- As the sword tip passes through the target, go into the basic side (teardrop) return to the sword side: (Please see Figure 13h, above.)
- The sword should move down past your right hip.
- As the sword hand reaches the hip, start a step with the sword leg, and start the forward motion of the hip. The step should finish as the sword starts to rise up again.
- The forward rotation of the sword hip should complete when the sword passes back forward over the sword shoulder.
- The sword circles back and up. (Please see Figure 13i, above.)
- As the sword moves back and up, it is necessary to lift with the index finger, and curl the little finger, and the hand, in a clockwise direction. This not only lifts the blade, but keeps the tip from moving across in back of you towards the sword side.
- The tip of the blade should be higher than the hand after the sword passes through the horizontal.
- The shield hand should start pulling forward as the sword starts to rise past the horizontal.
- The sword is then pulled forward for a backhand blow through the same target.
- As the sword hand moves forward over the sword shoulder, the hand should be, if possible, as high as the top of your head.
- The sword tip should be outside and above the sword hand.
- Continue the strike towards the target, again slowing the movement as the sword hand approaches the target.
- Repeat as before.
Take care to:
- Keep the sword moving at a constant rate throughout the exercise except while slowing for the accuracy portion.
- Keep moving between repetitions. Do not stop.
- Keep the sword tip should be moving in a large, bent, figure eight (actually an infinity sign). At no time, however, should the tip of the sword move inside your shoulders while the blade is behind you.
- Keep the angle of the sword strikes should be about 45 degrees.
- Exaggerate the pulling and pushing with your other hand.
If you use the exercise standing with a pell instead of walking, you must concentrate on starting the hip movement as the sword hand reaches the hip while moving back.
A variation can be done by starting the walk/swing with the sword arm across your chest (tip still pointing up and back) so that the first swing is a backhand, while the opposite foot is stepping. Otherwise, the movements are the same. This provides more of an awareness of the contributions of the shield side of the body to the power of the strikes.
Return Analog
|

Figure 14a |

Figure 14b |

Figure 14c |

Figure 14d |

Figure 14e |
|
This is a very useful exercise in teaching the basic movements and timing of the side or "teardrop" returns. The motions are very formalized, but correspond very well to the movements and timing of the actual return. This formalization provides very specific, and easily identifiable points at which the constituent motions are started and stopped.
The exercise is taught in two phases. The first phase is only concerned with the movements of the arms and hands. In the second phase, training in the timing of the hip movements and power application is added. Students should master the first phase before adding the movement of the second phase.
The starting position is as follows, and must be returned to between each repetition of the exercise. Please see Figure 14a, below.
- Have the feet parallel, and shoulder width. Keep the knees unlocked, but not bent.
- Cross the shield arm across the chest, keeping the elbow in close to the side of the body. Have the extended fingertips touch the front of the sword shoulder.
- Cross the sword arm across the chest, keeping the elbow in close to the side of the body. Have the sword hand just under, and inside of the shield shoulder.
- Point the tip of the sword up and out, along the direction of the forearm.
To perform the first phase of the exercise:
- Start sliding both hands down your chest. As they move down, they will move towards the center of the body. Please see Figure 14b, above.
- Keep the elbows in tight to the sides of the body. If necessary, allow the hands to move out from the body to allow the elbows to remain stationary.
- As the hands move down, turn them palm down. The blade of the sword will slide along the shield side of the body as the hands move down.
- Start breathing in.
- When the hands reach a point just below your waist, and the sword hand is directly above the shield hand, (this is the farthest downward extension): (Please see Figure 14c, above.)
- Start curling the little fingers of both hands strongly towards the base of the respective thumbs, as close to the wrist as possible.
- At the same time, start turning the thumbs out, so that the hands start to move from palm down to palm forward.
- Start moving the hands, with the arms remaining extended, out and up. Keep them in the plane defined by the shoulders. As the hands pass the shoulders on their way up, the alms should complete their turn to forward. This is the first critical timing point.
- The hands, with the arms extended, should continue to move out and up to an angle about 30 to 45 degrees above horizontal. Please see Figure 14d, above.
- Complete your inward breath.
- The sword should be pointed up and out, in approximately the same direction as the arm, but at a slightly more vertical angle. The tip of the sword should be well above the hand. This is the second critical timing point.
- Move your arms down and in towards their original starting position. Please see Figure 14e, above.
- Start breathing out.
- Start moving the elbows first.
- As the elbows start in and down, start curling the fingers towards the inside, causing the palms to turn in, then towards the rear. This rotation should be completed when the sword has moved about one third of the way down. This will usually occur naturally.
- Pull the blade down its length, causing the tip to follow in the same path as the hilt. Be careful not to let the tip lead, or try to lead, the hand.
- Allow your hands to cross as they move in.
- Stop the movement when they are in their original starting positions.
- Finish breathing out when your hands reach the original starting position.
- The only difference between this and the starting position, is that the sword is pointing up to the sword side, while in the starting position, the sword is pointing up to the shield side.
- Move the sword so that the tip points to the shield side, and then repeat the exercise.
To perform the second phase of the exercise:
This phase is the hand and arm movements of the first phase combined with a 90-degree rotation of the body towards the shield side. The feet should not swivel during this movement, but it is acceptable if they turn slightly. The important aspect of this rotation is that:
- It should begin at the first critical timing point, which is when the hands start to move out.
- It should end at the second critical timing point, which is when the hands reach their farthest upward position. The position shown in Figure 14f is the equivalent of the one shown in Figure 14d, above, but after the 90-degree turn.
This closely approximates the timing of the power application of the hips during the teardrop return.
| |
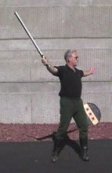
Figure 14f |
|
I have found that good precision in performing the exercise will be rewarded in improvements in the performance of the actual return. In addition, incorrect performance of the exercise will allow the instructor to identify certain problems in the execution of the technique, itself. Some of these are as follows:
- If the elbow moves out from the body when the hands are moving down:
- During the actual return, the student is likely to pull the sword back more with the arm than the body.
- This will cause the sword hand to be closer to the body than the elbow when it is time to move the sword up and farther back.
- When this occurs, the sword can only be moved by 'flipping' the wrist over, causing the hand to turn palm up, and the blade to move strongly across the back of the fighter to the shield side. This wastes motion and time.
- If the tip of the sword is lower than the hand when the sword is moving out and up:
- During the actual return, the student will find that the tip drags as the sword moves up and forward.
- This will limit the subsequent strike to angles close to vertical.
- If the tip of the sword leads, or starts to lead the sword hand when the sword is moving from the highest position back to the starting point:
- During the actual return, there will be a "wobble" in the blade as the tip adjusts from pointing to the shield side back to moving around the sword side during the forward motion of the sword on the subsequent strike.
- This is not serious if the subsequent strike is forehand, but it does slightly delay the sword.
- If the subsequent strike is an overhead blow, considerable power will be lost.
Return Timing
|
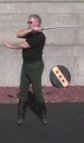
Figure 15a |

Figure 15b |
Figure 15c |

Figure 15d |
Figure 15e |
|
This is a rather odd exercise, but it is useful in learning the proper timing for hip rotation and duration while executing the teardrop return and the subsequent strike. As mentioned before, the timing of the start and duration of the hip rotation the snap, side return, and subsequent strikes is critical.
The exercise consists the student standing with his or her feet parallel, and swinging the sword forward and back in a U-shaped path in a plane in front of the student. The sword hand is lowered and flipped at the lowest point in the swords path, as it passes directly in front of the student. The sword hand is raised and moved to the front or rear as the sword reaches the tips of the "U". During this motion, the hips are rotated in the opposite direction of the sword's travel. The hips face forward at the low point in the "U".
When teaching the exercise, I find it useful to teach it in three phases.
- In the first phase, the sword hand moves directly up and down in a vertical path in front of the student, flipping over at the lowest point. The sword flips from side to side, with the tip first pointing left, then right. The path should be in a vertical plane.
- During the second phase, I add the hip rotation.
- During the third phase, I add the movement of the sword hand respectively to the left and right as the sword moves in those directions.
To start the exercise:
- Stand upright with your feet roughly parallel, or with the toes pointed slightly out, or with the toes pointed slightly to the shield side. Parallel is best to start, and pointed slightly to the shield side is best once you've mastered the movements.
- Hold your sword so that the blade is horizontal and pointing left, the sword hand is as high as your chin, and the sword arm is partially extended so that the sword hand is palm down, and 12 to 16 inches in front of your face.
Phase 1:
- Drop the sword hand straight down.
- When the sword arm is nearly fully extended down.
- Flip the hand over, turning the palm up, curling in with the little finger, and lifting with the index finger.
- Allow the tip of the sword to swing around the bottom of the "U" towards your right side.
- Raise the sword hand back up to the starting position, with the palm up.
- While the hand rises, the sword tip should swing to the right.
- The sword should swing up to horizontal.
- Drop the sword hand straight down.
- When the sword arm is nearly fully extended down.
- Flip the hand over, turning the palm down, curling in and lifting with the thumb.
- Allow the tip of the sword to swing around the bottom of the "U" towards your left side.
- Raise the sword hand back up to the starting position, with the palm down.
- While the hand rises, the sword tip should swing to the left.
- The sword should swing up to horizontal.
- Repeat.
Phase 2:
- Modify the starting position used in phase 1 so that your hips and upper body are turned to the right. Do not swivel your feet.
- Start performing the exercise as described in phase 1, except;
- Each time that the sword hand flips over at the bottom of the "U", rotate your body to the other direction. So, when the hand is at its highest points, you should be facing in the direction opposite to the one in which the sword is pointing.
Phase 3:
- Modify the starting position used in phase 2 so that while your hips and upper body are turned to the right, your sword arm is extended across your chest to the shield side. Do not swivel your feet. Please see Figure 15a, above.
- Start performing the exercise as described in phase 2, except;
- Instead of dropping your sword hand straight down, bring it down and towards the direction in which the sword is moving. The sword and both arms should pass through the same position at the bottom of the "U". Please see Figures 15b and 15d, above.
- At the top of the "U" to the sword side, your sword arm should be fully extended, and roughly horizontal. Please see Figure 15c, above.
- When the sword moves back in the opposite direction, move the sword hand down and across in that direction. Please see Figures 15b and 15d, above.
- At the top of the "U" to the shield side, your sword arm should be extended horizontally across your chest towards the shield side. Please see Figures 15a and 15e, above.
- At all times, swing your shield arm in the opposite direction of your sword arm.
|
)
)
)
)
)
)
)
)
)
)
)
)
)
)
)
)
)
)
)
)